One end of IPSec tunnel is a Paloalto Firewall with Static Public IP address and the other end is Cisco router with Dynamic IP address and behind an Internet modem. For the purpose of this article, 10.10.10.1 is considered as Static Public IP configured at Paloalto Firewall.
Configure Cisco Router
1.Configure ISAKMP (IKE) – Phase 1
ISAKMP is defined globally, that means if we have different ISKAMP Phase 1 policies configured, when router tries to negotiate SA with remote site, it will send all those ISKAMP policies and use the first one that matches both ends.
(config)# crypto isakmp policy 1
(config-isakmp)# encr 3des
(config-isakmp)# hash md5
(config-isakmp)# authentication pre-share
(config-isakmp)# group 2
By default, ISAKMP lifetime is 86400 seconds.
2.Configure Preshared Key
(config)#crypto isakmp key s@l@l@h11 address 10.10.10.1
where 10.10.10.1 is the public IP address of the remote peer and s@1@1@h11 is the preshared key being used when Cisco router is trying to establish VPN connection with Paloalto peer device.
3.Configure IPSEC – Phase 2
(config)# crypto ipsec transform-set itadminguide-set esp-3des esp-md5-hmac
where itadminguide-set is a user firendly transform-set name, it can be any preferred name.
4.Configure ACL
(config)# access-list 100 permit ip 192.168.8.0 0.0.0.255 192.168.0.0 0.0.0.255
IP subnet 192.168.8.0 presents at Cisco Router LAN end and 192.168.0.0 is at Paloalto LAN.
 Starts at 30$ per month
5.Configure Crypto map
Crypto map connects the previously defined ISAKMP and IPSec configuration together
(config)#crypto map itadminguide-cryptomap 10 ipsec-isakmp
% NOTE: This new crypto map will remain disabled until a peer and a valid access list have been configured.
(config-crypto-map)#set peer 10.10.10.1
(config-crypto-map)#set transform-set itadminguide-set
(config-crypto-map)#set isakmp-profile R2_ISAKMP_PROF
(config-crypto-map)#match address 100
6.Configure Key
(config)#crypto keyring KEYR1
(conf-keyring)#pre-shared-key address 10.10.10.1 key s@l@l@h11

(config)#crypto isakmp profile R2_ISAKMP_PROF
% A profile is deemed incomplete until it has match identity statements
(conf-isa-prof)#keyring KEYR1
(conf-isa-prof)#self-identity user-fqdn [email protected]
(conf-isa-prof)#match identity address 10.10.10.1 255.255.255.255
(conf-isa-prof)#initiate mode aggressive
7.Apply crypto map to Public Interface or VLAN
(config)#interface vlan 2
(config-if)#crypto map itadminguide-cryptomap
8.Create NAT and ACL Policy
ip nat inside source list 101 interface Vlan2 overload
ip route 0.0.0.0 0.0.0.0 192.168.1.1

access-list 101 deny   ip 192.168.8.0 0.0.0.255 192.168.0.0 0.0.0.255
access-list 101 permit ip 192.168.8.0 0.0.0.255 any
[ddownload id=”2356″ text=”Download complete Cisco Router configuration in plain text.”] [ddownload_filesize id=”2356″]
Configure Paloalto Firewall
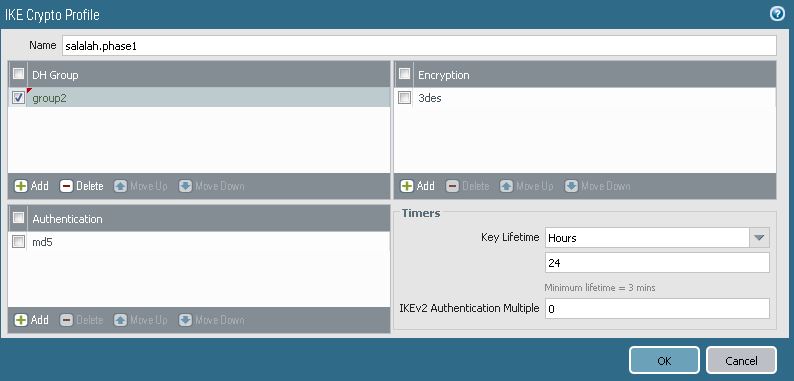
1.Configure IPSec Phase 1
Go to Network > Network Profiles > IKE Crypto and create IKE Crypto
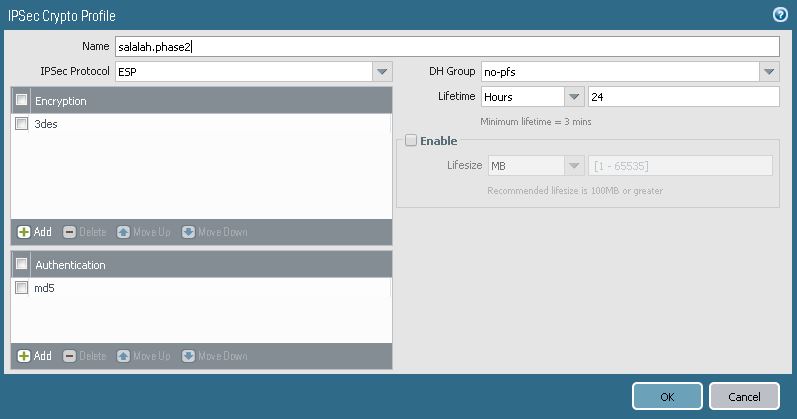
2. Configure IPSec Phase 2.
Go to Network > Network Profiles > IPSec Crypto and create IPSec Crypto
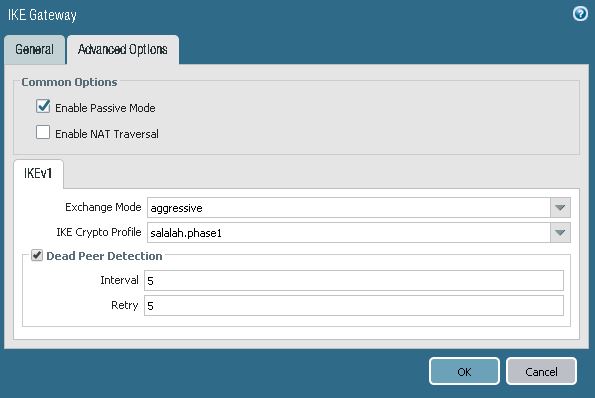
3. Configure IKE Gateway
Go to Network > Network Profiles > IKE Gateways
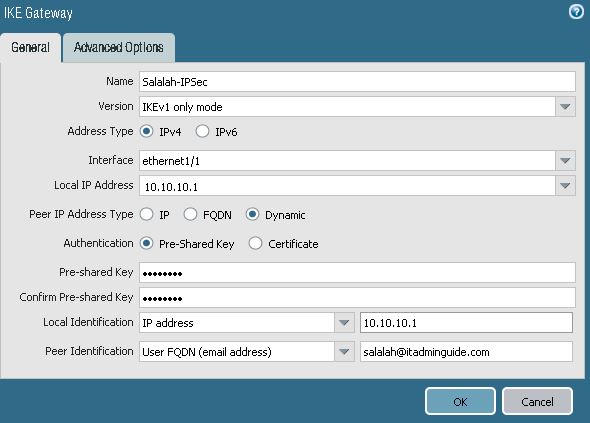
Configure Aggressive Mode in IKE Gateway Settings
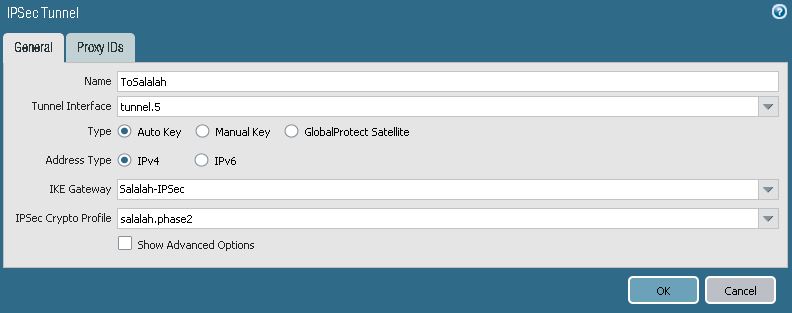
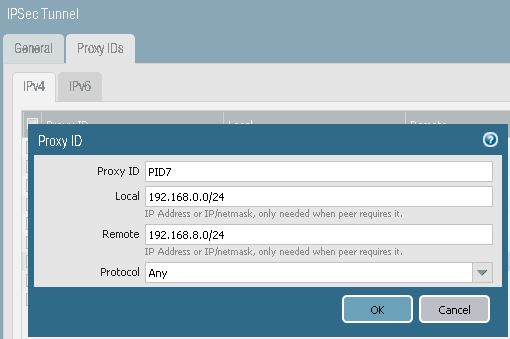
4. Configure IPSec Tunnel
Go To Network > IPSec Tunnel
5. Configure Security Policy
Go to Policies > Security
![]()
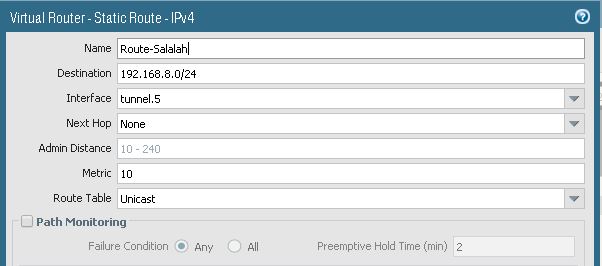
6. Configure Virtual Router
7. Permit IKE traffic on Outside Interface
Navigate to Policies > Security
Finally, you need to open IKE (port 500) on outside interface for peer IP to establish IPSec Tunnel.
![]()