Here is the best deployment method of Sucuri Firewall to protect your websites.
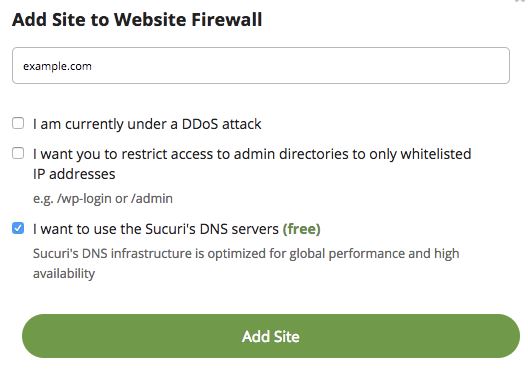
Step 1: Add your website in Website Firewall and choose the option “I want to use the Sucuri’s DNS Servers“
 $2.75 per month
Step 2: Change “A” record DNS of your website pointing to the “Firewall IP Address” provided by Sucuri.
Step 3: After successfully pointing DNS in Step 2, Sucuri Firwall gets activated.

Before we proceed to next step, you must ensure that your website loads with out any problem.
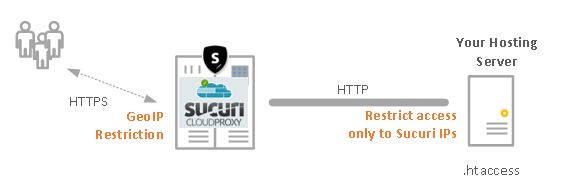
Step 4: At your hosting server, restrict the website access only to Sucuri Server IP addresses. If you don’t perform this step, attackers can easily bypass Sucuri and reach your website by IP address to perform attacks .
Here is how to use .htaccess to restrict your website to only Sucuri Server IPs. Instead, you can also perform these steps on your on-premise firewall.
Step 4.1: Go to Sucuri Firewall > General > Overview to get the list to be whitelisted.
Here is how to use .htaccess to restrict your website to only Sucuri Server IPs. Instead, you can also perform these steps on your on-premise firewall.Step 4.1: Go to Sucuri Firewall > General > Overview to get the list to be whitelisted.
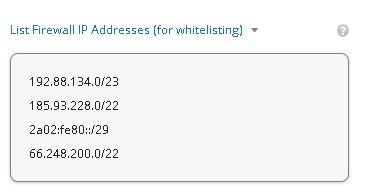
Step 4.2: Create a .htaccess file and placed in the root of your directory.
 Starts at 30$ per month
order allow,deny
deny from
allow from 192.88.134.0/23
allow from 185.93.228.0/22
allow from 66.248.200.0/22